If you’ve ever asked yourself, “where do you edit the images on your wordpress website”, you’re not alone. The best practice to optimize visuals of almost every website is to balance aesthetics and performance. Here we will go through how the WordPress media library works and how to work with wordpress images, from understanding what the media library is and where to find the image editor, until the question: where do we edit wordpress images?
Images are a crucial part of any website. However, they can attract attention, send a message and enhance user experience. But overloaded images or not edited properly can slow down your site and also degrade SEO. Thus, finding out where you should correct the images on your wordpress website so it becomes right? WordPress’s media Library and its simple yet effective image editor have the answer. In this article, we’ll cover the step-by-step process and the SEO benefits of making the most out of your image editing capabilities.
1. Understanding the WordPress Media Library
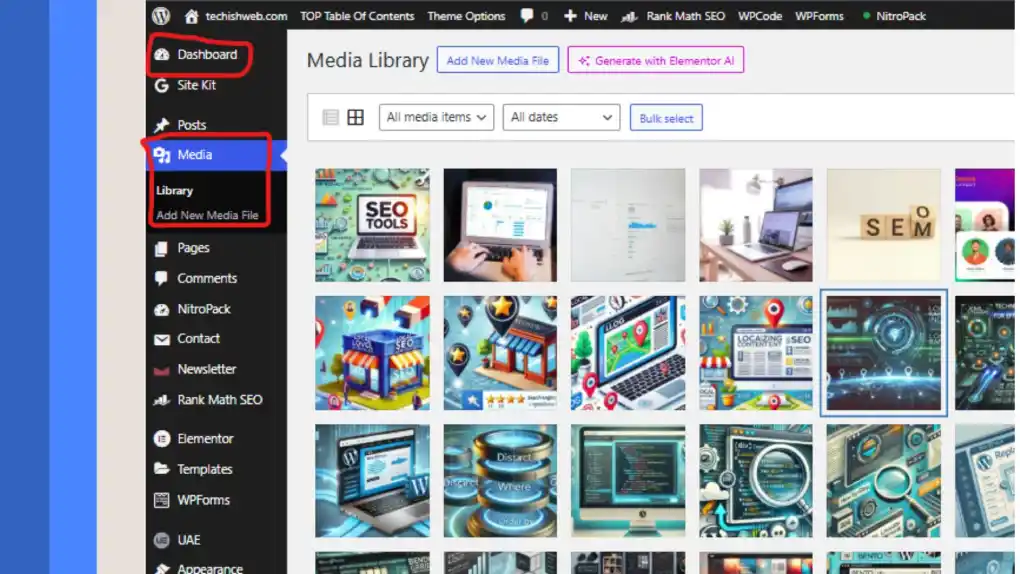
When wondering where do you edit the images on your wordpress website, the first place to check is the Media Library. This section of your WordPress dashboard houses every image, video, and media file you upload.
What is the Media Library?
- Central Hub for Media: All your uploaded pictures are stored in the Media Library. It is not just a file manager but it also helps you to keep track of things such as image title, caption, alt text and description.
- Access Point for Editing: You will see the “Edit Image” button once when you click any image in the Media Library. This is the only way in to the simplest of editing functions like docking, resizing, rotating and flipping.
Understanding the Media Library is key to answering the question: where do you edit the images on your wordpress website. It makes necessary the interface to optimize and fine tune your visuals while you are still inside your WordPress dashboard.

2. How to Edit Images in WordPress
First let’s take a look at the step by step process of editing an image and what simple tools are provided with WordPress.
Step 1: Navigate to the Media Library
- Access the Dashboard: Log in to your WordPress admin panel.
- Go to Media » Library: Here, you’ll see all the images that have been uploaded to your site.
- Select an Image: Click on any image you wish to edit.
At this point, if you’re wondering where do you edit the images on your wordpress website, you’ve already found the starting point—the Media Library.
Step 2: Use the Built-in Image Editor
To select an image click Edit Image button after. They will offer you several options in the image editor.
- Crop: To weeded out the areas of your image that you do not want to focus on, it is just a matter of removing them.
- Resize (Scale): Adjust the image dimensions. This means that WordPress lets you reduce images dimension to improve page load time.
- Rotate and Flip: The image direction can be easily adjusted.
- Undo and Save: If you make an error, you can undo your changes, then save once you’re satisfied.
These options answer the question directly: where do you edit the images on your wordpress website in the Media Library’s built-in editor.
Step 3: Edit Within the Post or Page Editor
If you’re using the Gutenberg block editor, you can also add an image block directly to your posts or pages. However, for more detailed modifications, it is recommended to open the image via the Media Library where you have full editing tools.
3. SEO Benefits of Proper Image Editing
Editing your images isn’t just about visual appeal—it’s also an essential part of optimizing your site for search engines. Here’s why answering where do you edit the images on your wordpress website matters for SEO:
- Faster Load Times: If the images on your site are optimized, such page load times will have a positive effect on SEO rankings.
- Improved User Experience: Well copped images add much to the competitive online market as they will attract visitors.
- Enhanced Accessibility: Adding descriptive alt text in the Media Library not only explains your image to search engines but also improves accessibility for visually impaired users.
If you also know the things where the images on your wordpress website are edited you can then optimize your visuals equally for performance and search engines.

4. Advanced Image Editing and Plugins
The built-in image editor in WordPress is very good for the basics but there are some users who need more. Fortunately, Jetpack or ThumbPress can go one step further with your editor.
When to Use a Plugin
- Advanced Cropping and Resizing: Then it will come in handy if you require more control of dimensions or want to bulk edit.
- Applying Filters: In addition, plugins usually come with a great variety of filters and effects unavailable in the default editor.
- SEO Enhancements: Optimized file names, alt tags and in some cases even compress images without loss of quality can be automatically generated by some plugins.
Even if you opt for an advanced plugin, knowing where do you edit the images on your wordpress website remains crucial because all plugins integrate with the Media Library to offer enhanced features.
Conclusion
Answering where do you edit the images on your wordpress website is straightforward once you know the ins and outs of WordPress’s Media Library and its built-in image editor. With WordPress it can do from a basic functionality like cropping and resizing, all the way up to more advanced which plugins offer, for optimizing your images. In addition to that, it makes your site much better looking, faster loading, and better performing in regards to SEO.
So the next time you are wondering where do you edit the images of your wordpress website, well head on to your Media Library, hover on your image and click on Edit Image. Now that these tools and techniques are available to you, you can be assured that every single image on your site will be displayed as very best.
If you can manage the answer to how to alter the images located on your wordpress website, you’re very likely to make for a site that looks lovely and too, and one which supports search effectiveness.
Common Questions and Troubleshooting
Even experienced users sometimes face challenges when editing images. Here are some frequently asked questions regarding where do you edit the images on your wordpress website:
Ensure you are in the Media Library view. If you are editing within a post, try switching to the Media Library for a full-featured editor.
This might be due to browser caching. Clear your cache and refresh the page to see the updated image.
The built-in editor does have an option to restore the original image if you aren’t happy with your edits.
Each of these troubleshooting tips reinforces the main question of where do you edit the images on your wordpress website, emphasizing the Media Library as your primary editing hub.
This article is designed to help you understand the crucial steps and benefits of editing images in WordPress—specifically, answering the question where do you edit the images on your wordpress website in a clear and actionable way.


